Showing posts with label Tutorial. Show all posts

DIY Wedding Card Box Tutorial

How gorgeous is the wedding card box?! But, at $115 (plus $25 shipping) I knew it was a great opportunity for a little wedding DIY! 
Card Box by The Wedding Main Street

Here's how mine turned out (more photos at the end of this post):

Now for the instructions!

These card boxes are basically just fabric covered nesting boxes with some accessories on the outside. I purchased a set of nesting boxes from Amazon.com for about $25 and two yards of amazing silk dupioni fabric from a store in Los Angeles' fashion district for $30 on sale. I also found some rhinestone yardage in the fashion district and purchased enough to wrap around the exterior of the boxes.

First, I cut a large hole in the lids of the bottom two boxes, leaving about 2 inches to the edge. Then, I cut a thin slit approximately 2 inches wide and 6 inches long on the lid of the smallest box.  This way, when a guest would drop a card in the box the card would fall through the holes in the lids down to the bottom box. 

Next, I covered the boxes in the fabric. This step takes some extra care because it's important that the fabric adheres flat to the boxes but it's very much the same as simply wrapping a gift. First, cut your fabric to cover the bottom, sides, and about 3 inches into the inside of the bottoms of each of the 3 boxes. 

Spray the cut fabric with fabric glue. I used Elmer's Craft Bond.

Wait a few minutes so that the glue is tacky and not runny and wet then start "wrapping" the bottom of the boxes with fabric. Be sure to smooth the fabric as you go so there are no wrinkles or air bubbles. The middle and top box have holes in the bottom of the boxes. Place the bottoms of the box right side facing up so you are looking down into the interior of the box. Using an exacto knife, cut the fabric over the hole in the box.

The lids follow a similar process.

Cut the fabric to cover the entire top and sides of the lids and allow for extra fabric to be tucked to the inside of the lids. Lightly spray the fabric with fabric glue. Ignore the fact that the holes and slit exist in the tops of the lids and cover the entire top and sides of the lids. Once they have dried, flip the lid so that the bottom is facing up and you can view the slit from underneath. Use an exacto knife to cut the fabric covering the slit leaving approximately an extra inch of fabric. 

Flip the lid over so that the top is facing up. Push the excess fabric covering the slit to the underside of the lid. Using fabric glue, glue the excess fabric over the slit to the underside of the lid.

Place the largest lid on the largest box. Place the middle box bottom on top of that. Using binder clips, through the hole of the bottom box clip the bottom of the middle box to the hole in the top of the bottom box. Do the same to hold the middle and top boxes together.

Once the boxes are stacked together, accessorize the boxes any way you like. I made some fabric flowers for the bottom and placed rhinestones and our names on the middle and top boxes. Another bonus? The boxes can come apart and placed inside one another for easy transport :)


Here's some more photos of the finished wedding card box:

Dress Up Your Drinks!

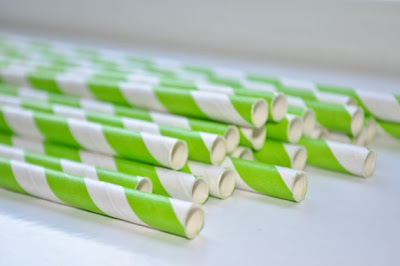
Personal touches really make your particular event unique and they don't have to be expensive! Since signature cocktails have been all the rage at weddings the past couple of years, I wanted to add some pizazz to the concept. I saw striped paper straws with darling little paper flags on them at a friend's baby shower and knew I had to do this project for the wedding. I think they turned out really cute and ended up being a fun addition to the cocktail hour!

This project requires the following items:
*Paper Straws
*Glue dots or double-stick tape
*Computer paper
*Paper cutter or cutting mat and ruler

I purchased paper straws off Etsy ($14 for 100 and oh so many colors and styles to choose from!) and edited an address label MS Word template to fit 1 inch x 4 inch labels. You can also find a free template here

I typed in various relevant words or our wedding date onto the labels so that both sides of the label would have text on them (Ex] our first names and the wedding date, our first names and "celebrate", etc.)

Next, I printed the labels onto regular computer paper and cut them into individual labels. You could easily vary the ink or paper colors to completely customize your look. I choose several combinations of green and charcoal gray ink on plain white paper.

Using a glue dot roller I adhered the sticky dots to half of the label. I wrapped the label around the straw and lined up the edges before pressing firmly along the length of the label back to the straw. 

These were definitely a hit at the cocktail hour! The straws were displayed at each of the bars next to a sign I made for our signature drinks.


Formal Pleated Clutch - Tutorial

Ok, friends! It's time for another tutorial :) These adorable envelope clutches have a stylish pleated exterior. These are a bit more time consuming than a typical envelope clutch because of the extra pleated detailing but it's totally worth it!

These clutches can be customized to any dimension and I decided to make mine 5inches x 10inches.

I used a black silk for the exterior, extra sturdy interfacing, and a deep plum silk for a gorgeous pop of color on the interior. The clutch will be folded in thirds so cut your fabric 3 times the final height plus an extra inch on each side for seam allowance (ex]17inches x 12inches for a clutch 5inches x 10inches).

Pin the exterior fabric around the interfacing.

Next, create the envelope pocket by folding the bottom of the fabric/interfacing up. I wanted my clutch to be 5inches tall, so I marked the fabric 5 inches from the bottom on each side.

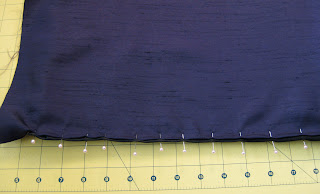
Using a straight edge fold the fabric up from the bottom and pin the fabric in place.

Fold the remaing fabric down over the envelope pocket. This will be the front of the clutch. Place pins on each side to mark the front fold line.

Cut the fabric for the pleated exterior about 6 inches wider and 3 times taller than the clutch. I used a black silk chiffon fabric for the pleated detailing and cut it 16inches x 15inches.

Fold the fabric in half and baste using a wide stitch. Ruching the fabric first makes it easier to pleat. To create a ruched texture, hold the bottom (bobbin side) thread while pulling the top thread.

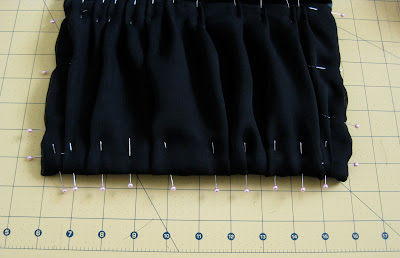
Place the ruched fabric over the exterior of the clutch with the folded side just above the fold line of the top flap. Pin the pleats of the ruched fabric to the exterior of the clutch.

Pin the sides of the ruched/pleated fabric under the exterior fabric and interfacing.
Pin the bottom of the ruched fabric under the flap of the clutch creating pleats by following the ruches of the fabric.

Sew the pleated fabric to the exterior fabric as close to the edge of the pleating as possible.

Mark the center of the foldline for the bottom front of the clutch.

One inch above that foldine insert the back of the magnetic snap closure with the magnetic snap facing out on the exterior of the clutch.

Folding the edges under, pin the interior fabric to the interfacing about 1/8inch from the edge around the clutch leaving the bottom of the envelope flap open.

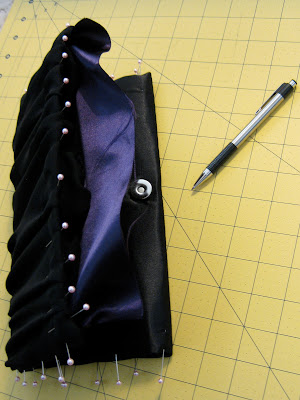
Fold the envelope flap to the magnetic snap and mark the placement location for the magenetic snap front.

Secure the front of the magnetic snap to the right side of the interior fabric. Tucking the edges under, pin the exterior fabric, ruched fabric and interior fabric along the edge.

Sew the entire perimeter of the clutch to secure the interior fabric, interfacing and exterior fabric together.

Fold up the bottom of the clutch to create the envelope pocket. Measure each side to ensure they're even.

Sew along the side edges of the pocket to secure it in place.

Fold the envelop flap down to secure it with the magnetic snap and Voila!
Well, I acutally don't have a picture of the finished product (silly me, I forgot to take a picture!) but trust me, it's super cute :) The finished products looks similar to this but with a straight envelope flap. 

Add extra adornments of beading or flowers for the perfect finishing touch!

Silk Shawl

I was recently asked to make shawls for an upcoming autumn wedding. The bride wanted shawls in two-toned style: an underside in a lovely eggplant color and the outward side in a formal black satin for her bridesmaids and a white and eggplant shawl for herself. Shawls are such a useful item to have and this project is relatively easy to complete. Between measuring, cutting, and construction, it takes about 1 hr to make each shawl.

As always, press your fabric first.

Using a cutting mat and straight edge, cut the fabric to your desired measurements. I cut mine to be 20" wide x 75" long.
You will end up with 2 long strips of fabrics - one for the front and one for the back.
With right sides together, pin the front to the back along the longest sides.
 Sew the 2 pieces together along the longest sides. Since these seems will not be seen it is unnecessary to have a perfectly matching thread but be sure to use a coordinating color regardless. I used a black thread and bobbin.
 I prefer to keep a pin cushion close by when I'm sewing long pieces of fabric like these. Often, it's  difficult to pin the fabric tight enough when pieces are very lengthy and the fabric will start to fold over on itself.
 Here you can see that the top black fabric was beginning to fold over on itself. Simply remove the pin and pull the fabric above and below the presser foot until it is smooth ensuring  fabric edges are aligned. Continue sewing.
 After the two long edges are sewn, pin one shorter side and sew along the edge.
 Turn the fabric right side out through the remaining unsewn side.
 Using a straight edge as a guide, fold over and pin the back piece of fabric.
 Matching the back piece of fabric, fold over the front piece of fabric again matching wrong sides together. This creates a even hem and only the right sides of the front and back fabric should be showing.
Since the fabric that I'll be sewing right side up is the purple fabric, I've kept my black bobbin but traded out the black thread for purple thread. This will ensure that the bottom black fabric will have matching black thread and the purple fabric will have matching purple thread since these stitches will definitely be seen.
 Beginning with the recently pinned folded over edges, sew the top purple fabric to the back black fabric.
 Continue the top stitch on both shorter sides and one longer side of the shawl. The longer side without the top stitch will be the top of the shawl. This will create a beautiful finished look on the 3 edges and a lovely draping effect on the top of the shawl.
 The finished product is the perfect accessory for any formal affair.